Sunday, 14 July 2019

Just Breathe

This page in my mini junk journal was
heavily inspired by France Papillon.
In particular this journal on Monday
video - 171 Brave
I wanted to emulate the texture that
France created, but using all I had.
Namely heavy gesso, brayer & PaperArtsy
Fresco Chalk paints.
This page is the reverse of the image
transfer & it was a tad fragile at the edges.
So I had adhered torn scraps of brown paper,
magazine paper & old tea bag paper in a
collage fashion (having learned from LorriMarie)
I watered down a little gesso to coat it all,
applying it heavier on the darker browns.

 I then began lightly brayering my colours;
PaperArsty Cherry Blossom,
Sugar Plum, Orchid & Pansy.
I added more gesso heavier in places & added a
frame of Spanish Mulberry using a brayer technique
Leandra had taught us in  the PaperArtsy videos.
I have several of the brayer ones in my playlist, here
I added stamping with some script images, which
I then knocked back with gesso.
I added gesso through this Circle Squared stencil
by Mike Deakin Art. 
I copied Frances technique of blending Inktense pencils
around the circles as I love my Inktense.
I journaled around them & then added a 
little black & grey for more definition.
Finally, as I loved the texture so much,
I just added the Prima Finnabair words.

Thursday, 11 July 2019

30th Birthday Commission

This card was commissioned by Lorraine,
an ex colleague, for her daughter, Rhianne.
The brief was;
sunshine, tea, Harry Potter, otters,
squirrels, meerkats & brightly coloured.
I think I managed to fit them all in!
  
The box itself was made using the free die with
Die Cutting Essentials - 51.
It started life as a plain piece of white card
& I made backgrounds on each side.
I kept the inside relatively subdued, but
the outside was a riot of stenciled, Dylusions paint colours.


I made a tiny book to place the 30 on so it wasn't too "in your face"
& put two quotes Lorraine requested onto tea cups.
(Dies by Simply Cards & Papercraft magazine issue 176)

I spelt out her name using Tim Holtz Alphanumeric dies.
I was careful to use free Harry Potter images from UI-Ex.com


Monday, 8 July 2019

Fran's birthday card

Our neighbour, Fran, had her birthday
last week. Being a keen gardener,
I like to create something floral.
This card is from Dad & myself.
She lives across from me, but next door to him.
Here is what I made.

Front panel is Spellbinders Botanical Bliss.
Flowers - Altenew Crown Bloom.
Inks - Altenew crisp inks;
Andromeda / Wisteria / Hydrangea / Sea Glass
Ocean Waves / Frayed Leaf & Forest Glade
I 💓 that Sea Glass in the centre of the front bloom.


Inside, I wanted a surprise!
So I made a box of flowers.
Box & balloons - Honeybee stamps 
Label with greeting is stamped using 
 

Friday, 5 July 2019

Happy Birthday Tracy!

It's my sister's birthday today.
I know she likes minimalist cards
&  the colour purple, so I created this.

The background is Spellbinders cover die Venise Lace.
Flowers are - Altenew Build a Flower Cattleya
Stamped in two different purple combinations.
Front Flowers;
Altenew crisp inks - Andromeda / Wisteria / Hydrangea
Rear flowers;
Altenew crisp inks - Andromeda / Deep Iris / Ultraviolet
Greeting is from Creative Stamping issue 29

Wednesday, 3 July 2019

Exotic - Mini Junk Journal

This is page 8 of the journal.
It is the reverse of Mildred,
with the cut out window & gold fretwork.
The page was covered with PaperArtsy Twighlight.
I added some lighter blue strokes in places
to give light & texture.
I then applied gold paint by Colourcraft,
through TCW Circle Doily stencil.


Because Mildred had a royal theme I wanted something equally 
opulent, luxurious, exotic for this side, so felt the
blue worked with the existing gold screen.
I added this stamped Altenew Build A Flower Cattleya
in shades of oranges as I felt they matched
the golds closer than any other colours.
The words are part of the meaning I found for
Cattleya Orchids. The rest got torn!
So I added luxury & exotic near the flowers,
because this is what they represent.

Here is an image of the page showing
that the page can been seen through to the other side.
You can just see my French Gentleman
from the London / Paris insert.

Saturday, 29 June 2019

"Each of us." Mini Junk Journal

I wanted a textural, vintage look for this page & so
I added torn die cutting off-cuts
to create a textured background.
I then built up my colour in stages,
using glazed layers. I love this technique!!
I usually only do it on canvas, but fancied a go
in an art journal.
I am very pleased with the results.

 Over the torn pages I applied a layer of Liquitex Heavy Gesso,
followed by a painted layer of Acrylic Titan Buff.
Once dry, I applied Prima Finnabair Art Basics Clear crackle paste
through a mini Tim Holtz numbers stencil.
I also added the pste with a palette knife to add other texture.
For my glazes I used;
PaperArtsy French Roast / Toffee
Daler Rowney Burnt Umber / Red Ochre
To emphasis some areas I added Dylusions Black Marble
paint & a little PaperArtsy White Fire.
I die cut the Xcut Cogs & applied gold embossing powder,
I then reheated the powder & sprinkled on salt.
This gives a distressed look.
I computer generated the words.
My thinking behind them was that we are all a mass of
tiny parts, which when working together in harmony,
create a happy world. The cogs symbolize the working together.
Not as in the most commonly used phrase, cogs in the wheel.

Wednesday, 26 June 2019

Happy Birthday, Kim

Kim worked with me for 10 years.
Since my redundancy, we have kept in touch.
She has two Labradors,
Bailee, her little lady is yellow & Bo,
her boisterous boy, is chocolate.
So, I made her this using the free stamps from

All stamps used were free with the magazine.
I used copics to colour the dogs & dog bed.
I used prismacolor pencils for the bones & toys.
Inside it reads.. Have a Fur..ry happy birthday.
 

Monday, 24 June 2019

Centre Pages of the Mini Journal

Having watched even more videos on
I just HAD to try her image transfer technique!
It turned out FABULOUS!!!!!!!
Seriously, if you have never seen her Altered Book
videos, go check them out.
She is based in Vallejo, California,
teaches in a really easy to understand manner
& is a really lovely human. 
In the past my transfers have been very much
hit & miss, with a whole load of miss.
This turned out perfect.
Granted it is a magazine image, but I am going
to try my hand with an inkjet print.
I have already learned how to get a coat of 
gel medium on them before they smear.
I saw the idea of putting a coat of medium
down on the gel plate & then placing images face down
& brayer them. It worked in the video by Artzology, here 

As this is the very centre of my mini junk journal,
it made sense to make a double page spread.
I prepared my image as per LorriMarie's instructions,
then after applying a coat of heavy gesso over my page, 
I applied a coat of PaperArtsy Smurf (blue) 
Once the image was prepared & dried,
I added a coat of Winsor & Newton Galeria Matt Medium
to the page & brayered down my image.
I then walked away for 48 hours!! 
I think this was the crucial thing, to let it dry.
Once dry, I added a little water & the backing literally
all came off leaving very little behind!!
The light blue underneath helped the image
to appear light. I added a white gesso border
all around as a vignette. I also added
some texture paste with a TCW well rounded
mini stencil to look like moving water/spray.
All I added to this were the stamped seabirds,
free with creative Stamping issue 72
& Tim Holtz words. I wanted the image to shine.
In hindsight, I wish I had added light green
in the areas where the cliffs are.
Magazine image was from Daphne's Diary.
 

Sunday, 23 June 2019

More about the bees

The houses are getting quite full,
but the last week of rain has held them back.
The Tree Bumble Bees that are nesting
in my soffits, are very busy gathering
pollen & don't appear phased by the rain.
I have had a job on my hands
reviving them. 😢
They do not have a long life cycle
but they are so pretty close up.
here is one enjoying a sugar water snack.
It's little tongue was out, lapping for all it was worth.
They never seem to stop, then suddenly they can't fly.
When they get really bad, they just run everywhere.
Sadly some are dying now.
 

This image shows three different types of bee
heading into the houses.
The bottom furry one is a mason bee,
I am not 100% certain what the other two are.
They are all solitary bees regardless & they
all have eggs tucked away now until spring.
 

Friday, 21 June 2019

Remember to Play.

Mini Junk Journal page.
I stumbled upon the YouTube channel,
of a lady called LorriMarie Jenkins.
She makes all kinds of Altered Books,
a subject dear to my heart.
(although I never tried a "true" altered one yet!)
What struck me was how she applied collage to
most pages for background texture.
It isn't something I do often.
I wasn't intending to make this page, it just sort of happened.
I was searching for something entirely different,
but during my search, 3 pieces of paper fell
onto my lap & I was surprised by how well
they appeared to go together.
I was drawn to create something immediately,
& this is what I came up with.
The torn wallpaper lining had a torn
piece of paper already glued to it.
The red with white scribbly flowers & button pieces
just fell out with it. 
I tore around the flowers & buttons,
attached them all together & then created my background.
This had some titan buff & glazes left over
from working on the adjacent page
(number 14, not completed yet)
it peeled off so I added a spot of Burnt Umber
& Red Ochre & blended them with gesso.
I then added burnt umber with a palette
knife around the frame & with an old gift card.
In fact the thing that took longest to
create was the word "collage" which
was cut from 7 different words in a magazine.
The final touch was the Tim Holtz phrase
"Remember to Play" 
I couldn't resist adding the little ladybug.

Tuesday, 18 June 2019

If nothing ever changed

Another mini junk journal page,
I have never been so prolific!
24 pages in approx. 2 months.
It's the power of the smaller surface,
works it's charm every time.😉

This is another cheerful page,
but with a more muted tone as I used gesso
to turn the colour more pastel.

I began with a coat of gesso, then added stenciling
using the same Julie Fei - Fan Balzer mini patterns
stencil with Dylusions paints.
Once dry, I added the images from Tim Holtz
stamps Fairytale Frenzy in Onyx Black
Versafine ink & heat embossed clear.
I added colour using brushos, keeping each
colour separate to prevent mud.
I used a brush to help them move.
Once dry, I stamped my quote which was
a free stamp set with issue 160
of Simply Cards & Papercrafts. 
To finish, I added texture paste through 
Art is - stencil TCW.
I love how it has soaked up colour in each section.
The texture paste I use is;
Golden Gel Mediums Light Molding Paste.
I bought the 946ml (32 fl.oz) size & it lasts.
 

Sunday, 16 June 2019

Happy Father's Day

After last year's moving
lawnmower, I knew I would have
my work cut out this year!
Still, thanks to Sam - Mixed Up Crafts
I came up with this! 😉 
 Birds - RSPB Garden Birds
free with Simply cards & Papercraft 187
Die cut watering can - Papercraft Essentials 173
Tools/Wellies/sign - Dovecraft Secret Garden


Primula / Marigolds / Nigella

die cut frame from my stash.
Stamped Images from;
Papercraft Essentials 173
Sentiment - Creative Stamping 70 
Flowers created with coloured cardstocks by Gina K Designs.
Inked with Distress Ink (original)
The Gina K Designs card cuts like a dream.

Friday, 14 June 2019

Sanctuary - Mini Junk Journal

This page was a map with a bird on it.
I so wanted to keep the bird but short of
tearing paper scraps & sticking them all over,
I had no idea where this page was going.

So I left it a while & did other pages in the journal.
Then I had an idea & came back to it.
This is actually page 6 - Sanctuary.

I thought the outlines of all the torn text
pieces looked like old castle walls or some
similar old building.
So I used PaperArtsy Fresco paints to
colour them using several greens, browns & grey.
I then added more colour to the bird & gave it some
sort of nest/ ground material. 
I fashioned the arch rather too perfectly
for real life, but it could really be
a small window in a castle.
I used my Inktense pencils to add further colour
& to highlight the "stone work".
Finally I added a sentence & some words from
an old RSPB magazine. It was an article about
birds seeking sanctuary in the urban cities of UK.

Wednesday, 12 June 2019

Memories - Colour Journal

This is another multi-coloured piece,
but with a black outline around my images.
I was watching some YouTube videos by
Niamh Baly & Inkyfairy design 
& I had forgotten how effective this technique
can be. Some really great examples on
YouTube are by Nika in Wonderland 

I decided to use the technique here.

I made a multi-coloured background,
added stenciling, gold leaf, all the same as
my Open Heart mini junk journal page,
but I added black marble paint over a die cut 
as a mask (Tim Holtz Bigz Sewing Room)
I added a lot more black than I liked &
when I tried to remove it, the colours smeared
losing the stenciling everywhere.
But, it is very visible in the mannequin silhouette
so I am extremely happy.
I added a Tim Holtz Mini Blueprints 2 image 
(Sewing Machine) & as my gold pen ran out,
I did my journaling in silver on the mask
(Cardboard die cut) & stuck it overlapping 
the silhouette. My words are about my mum.
she was a self taught seamstress & was bloody good.
All words by Tim Holtz.
Background stamps - Attic Treasures (TH)

Monday, 10 June 2019

Open Heart

Another mini junk journal page.
This began as a page from Daphne's Diary,
covered with clear gesso.
I added a couple of spots of Dylusions
paint in Vibrant Turquoise & Fresh Lime
& brayered them together lightly.
I added white, then more green.
Once this layer was dry, I added stenciling.
I used Mini Patterns - TCW
designed by Julie Fei - Fan Balzer 
I used more Dylusions paint
Lemon Zest/ Squeezed Orange
& more Vibrant Turquoise. 

 Once that layer was dry, I added Bubblegum Pink
through Swatton Flowers v.2 - Stencil Girl
Over this layer I added stamping in Archival Black
& Hero Arts Raspberry Jam inks.
The next layer was to add glue through a stencil
I used a UHU gluestick for ease.
Once tacky I added gold leaf.
I stamped Dina Wakley's Handwritten Heart Collage 
& then added heavy gesso around the edge to
white out the page & also the heart centre.
I then added Tim Holtz words.
This was extremely layered & colourful.
Way out of my comfort zone, but not now! 😀
I find myself loving this technique
& must try again ... SOON!!

Friday, 7 June 2019

"She Was" - Colour Journal

This page was all decided in my head,
except for the colour. I knew I wanted girly,
bright & happy because the quote itself
is not happy really.
The quote is by author Anna Funder & it says
"She was brave, strong & broken.
All at once."
I had planned to use three Mechanical Dolls,
digital stamps by A Day for Daisies, free from the
However, I realised I would need to use
one doll, three times for the quote to make sense.
I didn't use limbs.
I added underskirt/bodices using brayered paper
& die cut flower heads for the skirt of the dress.

 Materials:
Background is a card front die cut
Spellbinders Emmeline Treillage
Venise Lace - Becca Feeken.
Cut from fun foam & torn.
Script & number stamps -
Prima / 49 & Market
Tim Holtz - Flower Garden
Computer generated words.
 

Wednesday, 5 June 2019

Bee Update!

The bees have been extremely busy!
They are so clever! They know that female bees
hatch later than males & so they lay
the female eggs right at the back of
the tubes, put a bit of food in, then partition
it off with mud, before laying the next egg.
They continue this to the front of the
tube where the male eggs are laid & then
they seal up the entire tube.

This is the new house.
They have already filled about 20 tubes in
this photo. The actual number is 27 today.

This is the original house,
it is almost completely full.
Good job I saw sense & bought a second house!


This is totally new to me & absolutely fascinating!
I adore my little families, even if they are only eggs.
Sadly the bees fly off to die once the tubes are finished 😢
I ❤ Mason bees 🐝🐝🐝

Monday, 3 June 2019

Two Junk Journal mini pages

As this page is a folded piece
of Kraft packaging, I decided to 
create a single theme but over each side.

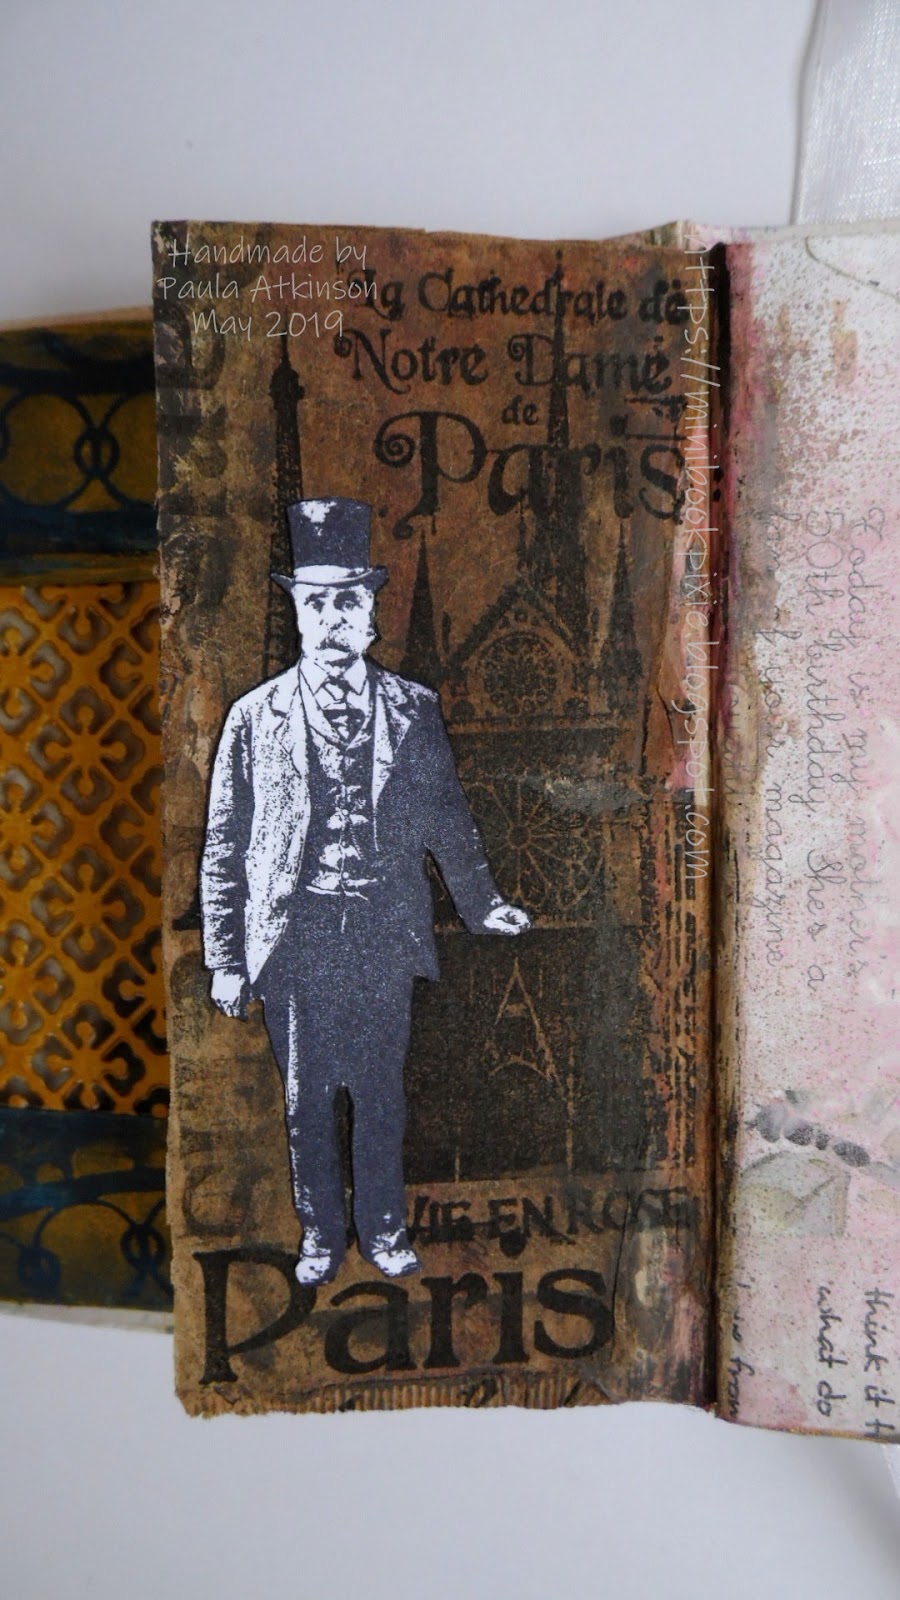
Side One - London
 Side Two - Paris
Each side measures no more than
4 3/4 inches tall x 2.2 inches wide.

London - was made using torn fragments of
Tim Holtz French Industry paper.
I sprayed Dylusions inks in browns,
Stamped Big Ben & the word London
then lightened the background so
you could see the design.
I added the stamped guard (Tim Holtz)

Paris - was made by painting the page buff.
I then adhered used tea bag paper over the top.
I added a little colour before stamping Notre Dame
& Eiffel Tower (Elusive Images stamps)
I then added the stamped French Man (Tim Holtz)

I thought it would be a struggle to create on such a small area, 
but as soon as the London/New York/ Paris 
phrase popped in my head, I had a light bulb moment.

Saturday, 1 June 2019

Birthday Card for Lorraine

who I used to work with at Bluefin.
(now Jelf)
I wanted something a little more 3D as this is
the first card I haven't made for others to sign.

Card front  is created using lilac cardstock by Gina K Designs
White card is Neenah Solar White card
Die cut is Woodland friends,
free with Die Cutting Essentials issue 32.


The inside is based on Jennifer Maguire's Spinner card,
but minus the spinner & with the grassy hills.
 
 The card was made exactly to the size of her card,
but I added the die cut grass by trial & error.
Materials used;
XCut Woodland Build a Scene dies
Stamps; A Walk in the Park
(free with issue 150 Simply Cards & Papercraft)
Die cut creatures; from the woodland friends die
used on the card front.
I kept it clean & simple inside to show off
the scene inside the woodland.

Wednesday, 29 May 2019

Wherever you are planted... Journal Page

Back working in my 5'x7' colour journal.
Here is one of my favourite colour schemes,
Lime & pink!

 Not sure I am keen on the edited picture,
but this was the best shot.
I first stamped Hero Arts Vine Leaf stamp
from the top right side of the background.
I then stencilled over it in Dylusions
Fresh Lime using the Arabesque stencil,
Over this I stencilled Tim Holtz Blossom.
I used Bubblegum Pink Dylusions to
colour my texture paste before applying.
I toned it down with a gesso wash.
Once everything was dry, I added silhouette stamping
& then added black die cuts both Tim Holtz.
The words are computer generated.
They are a French Proverb.
"Wherever you are planted, bloom with grace. "
These words are very apt with regards my current circumstances.  

Monday, 27 May 2019

Find Your Voice - Junk Journal

If I thought I loved Mildred,
then I must have a lot of love as I
love this one too! 😁
This idea came to me while watching a video 
on YouTube by Mike Deakin Art.
Mike created this page last year 
& I wanted to revisit the background he made
after watching this other video by him;
I loved both background ideas & they 
inspired me to create this page,
Find Your Voice.
 
I used Distress Oxide Inks
smooshed onto an old ledger card.
I added clear gesso first to give movement.
The colours I used were;
Peeled Paint / Shabby Shutters
Old Paper / Scattered Straw
& hints of Peacock Feathers.
I added stamping in the same colours
using bubble wrap, a bottle cap
& some ATC border stamps
(previously loved Elusive Images Set)
along with Archival Sepia Ink.
I added the word phrase Find Your Voice
several times (Donna Downey / Unity Stamp)
Then stamped Inkylicious Birds
in two places & on tissue.
I attached the tissue just off slightly to give shadow.
I then added touches of paint in buff & red. 
This made them Swallows.
Finally I added some words from Tim Holtz
to make up a part phrase I had seen on Pinterest.
 Love this colour combination, thank you Mike!

Friday, 24 May 2019

Back with another Junk Journal page - Mildred!

Yes, I'm still so in love with my
mini junk journal, I can't stop
playing in it. 😀
Today's page is all about Mildred
& her desire to play at being Queen.
This page is an old business envelope.
I die cut a square from off centre
& added two die cut trellis square
pieces behind. It's gorgeous,
but I just can't remember where I got it!
 I painted them gold to give a regal touch.
I then set to work colouring the rest
of the page in purple using
Lindy's Stamp Gang Magnolia Magenta Gold.

Next I added stenciling with Original Distress Ink
in Dusty Concord & the Tim Holt Stencil - Gothic.

I stamped a dictionary quote about a Lady,
which was free with Creative Stamping issue 70.
The chair was free with the pets set in issue 68.
I used copic markers to colour it "throne" red.
I then sat my Tim Holtz Paper Doll "Mildred" on the chair
& gave her a pet dog (paper doll) 
I stamped crowns on the page (PaperBag Studios)
& Bird Notes by Crafty Secrets Clear Art Stamps.
(They were purchased, previously loved & I don't 
know if they are available now) 
Finally, I added a book text crown, a gold staff & words.
The words near her head were originally
from Tim Holtz but they disintergrated so I
had to hit the computer & type my own! 
The ones below were found poetry & only the two
words in blue stated intact!!
I am working on the back of this page,
trying to find something suitable to cover the chair (throne)
showing through from this side.
But, I absolutely LOVE this page.

Tuesday, 21 May 2019

Card for Liz

This birthday card was made for Liz in April.
At the end of April, it was announced that
she was leaving Queen Bee Salon in Scunthorpe,
but as i had already made the card, I sent it c/o
the new place.

Materials used:
Stencil - Mike Deakin Art
Arch - Hunkydory Crafts - 
Moonstone Arch Windows dies.
Stamp - Stamping Bella Oddball -
Greeting Stamp - Clearly Besotted

This was another design using the fabulous Hunkydory crafts,
straight edged nesting dies - arched windows. 
I die cut a paper arch, stamped my image in B&W,
Put down the stencil & masked over top of the image.
After I removed the mask, I put the die on
& drew round it in black pen.
I then added wavy lines to give a more hand drawn feel.
I coloured my image & added her on top to get all the
swirls in the hair etc. as I do not have a die.